Set Up Your VPN with Newshosting
Step-by-Step VPN Setup Instructions for All Your Devices
Easily configure your VPN with our detailed tutorial for Windows, macOS, Android, iOS, and more, ensuring your online privacy and security across all devices.
30 Day Money Back Guarantee

Available for:
Already have VPN on your account? Click here to get started.

Newshosting VPN Activation and Setup
Newshosting’s VPN provides an all-in-one solution for online privacy, security, and unrestricted access to what you want, worldwide. Designed with ease of use in mind, it combines top-tier encryption protocols with lightning-fast servers to protect your data while ensuring high-speed connections.
Get setup on Windows, macOS, Android, iOS, Amazon FireTV, AndroidTV, or tvOS using the guides below.
-
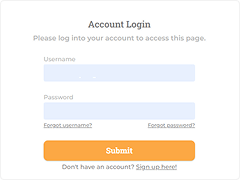
Log in to Newshosting website https://controlpanel.newshosting.com/
-
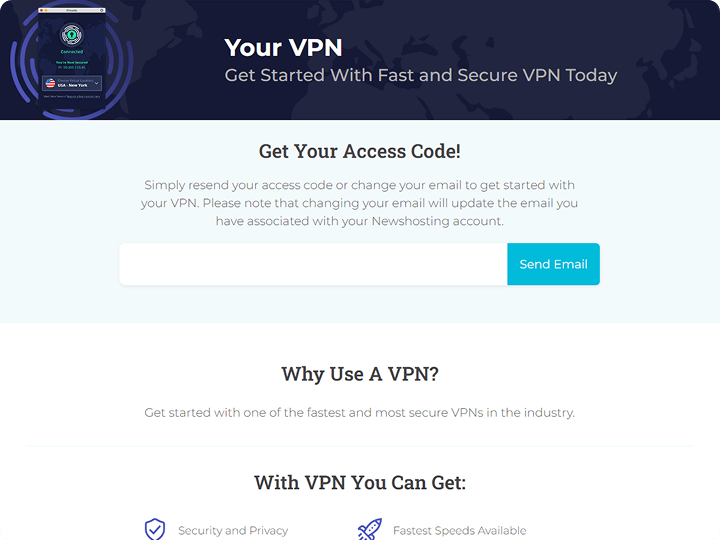
Click the banner “Get Your VPN today”

-
Enter your email address
-
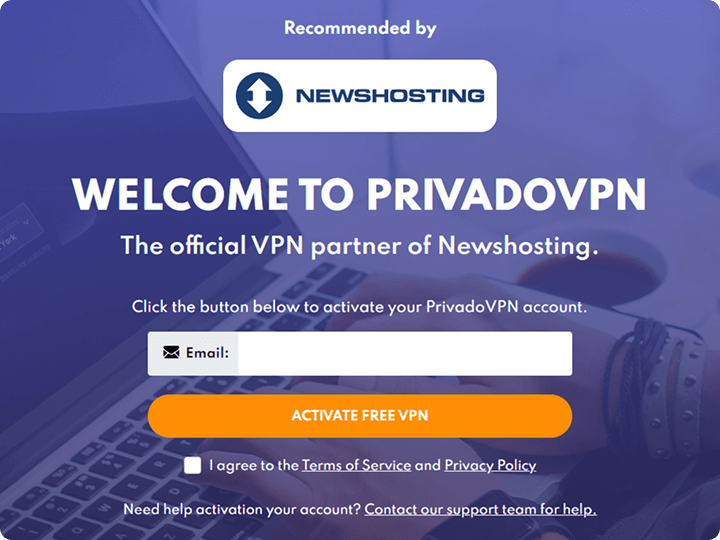
Click on the “Activate VPN” button/link on the email you will receive
-
Agree to the Terms and Conditions
-
Take note of your VPN credentials
-
Set up your PrivadoVPN.
This guide is for the installation and use of the PrivadoVPN Windows app
Compatible with Windows 8, 8.1, 10, 11.
For Windows 7 please use this guide (only for Premium plans).
-
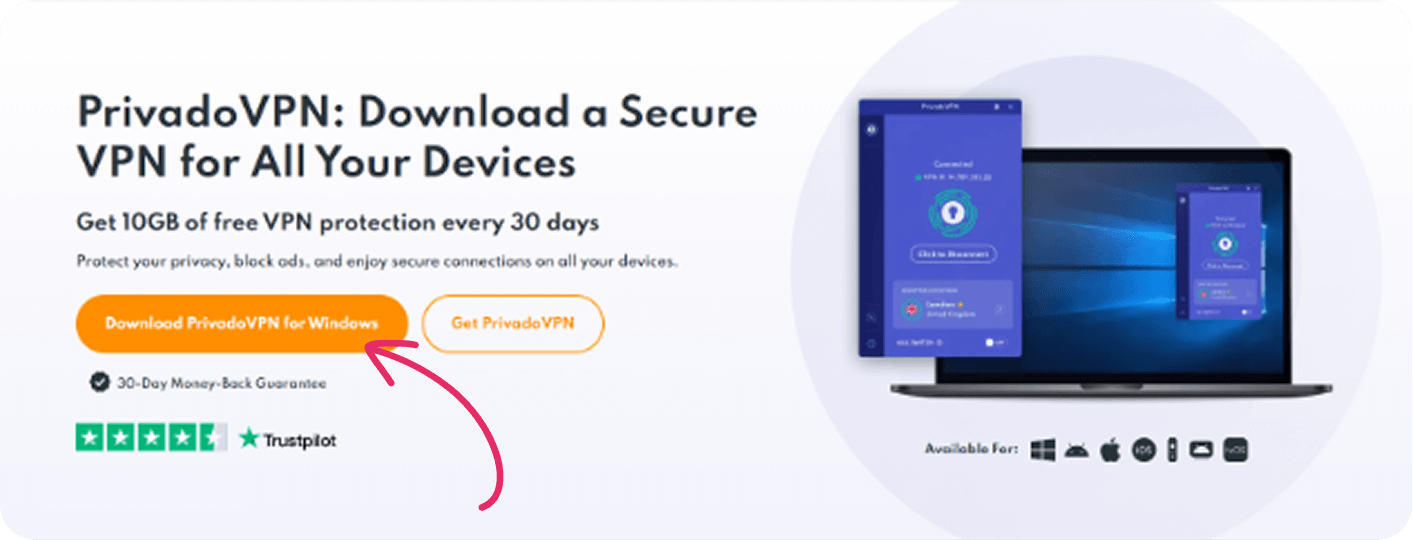
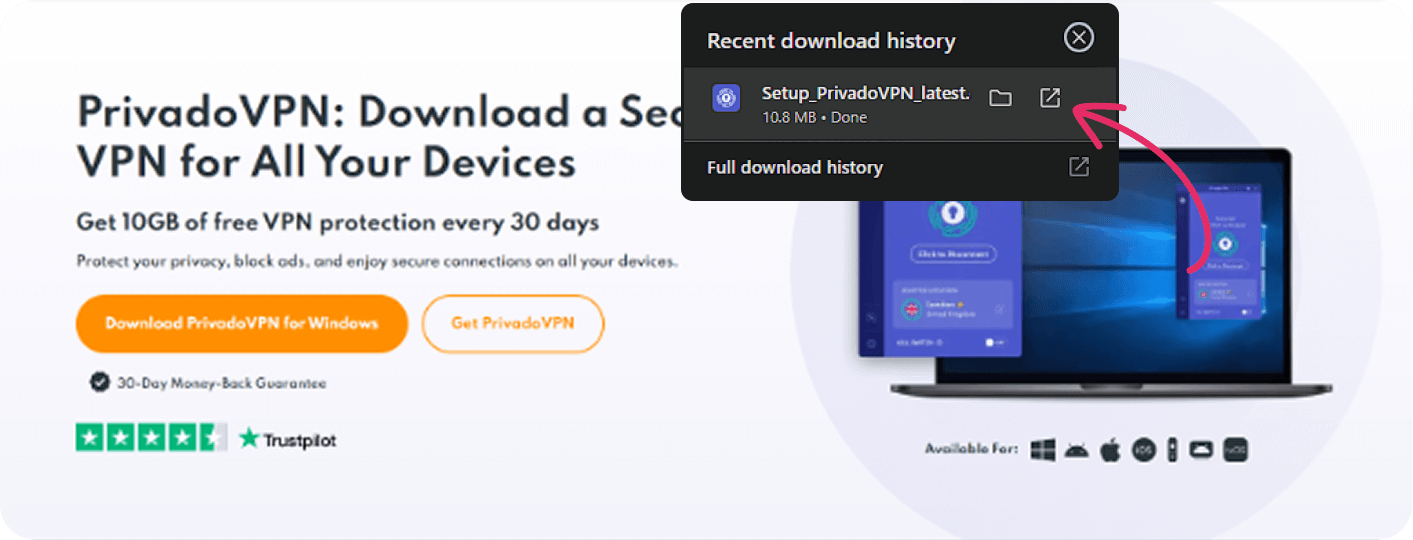
Go to the Privado website and click "Download now":
-
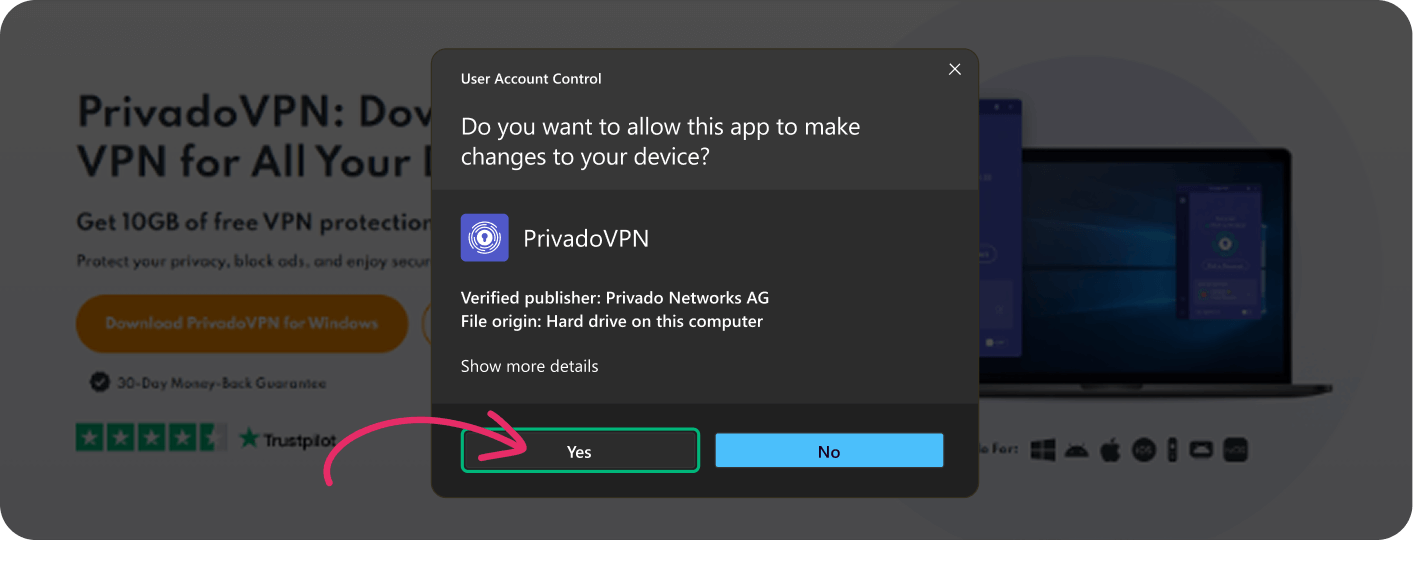
Double-click on the downloaded file to begin the installation:
(You might see a notification asking for your permission to set up the PrivadoVPN app - click "Yes").
-
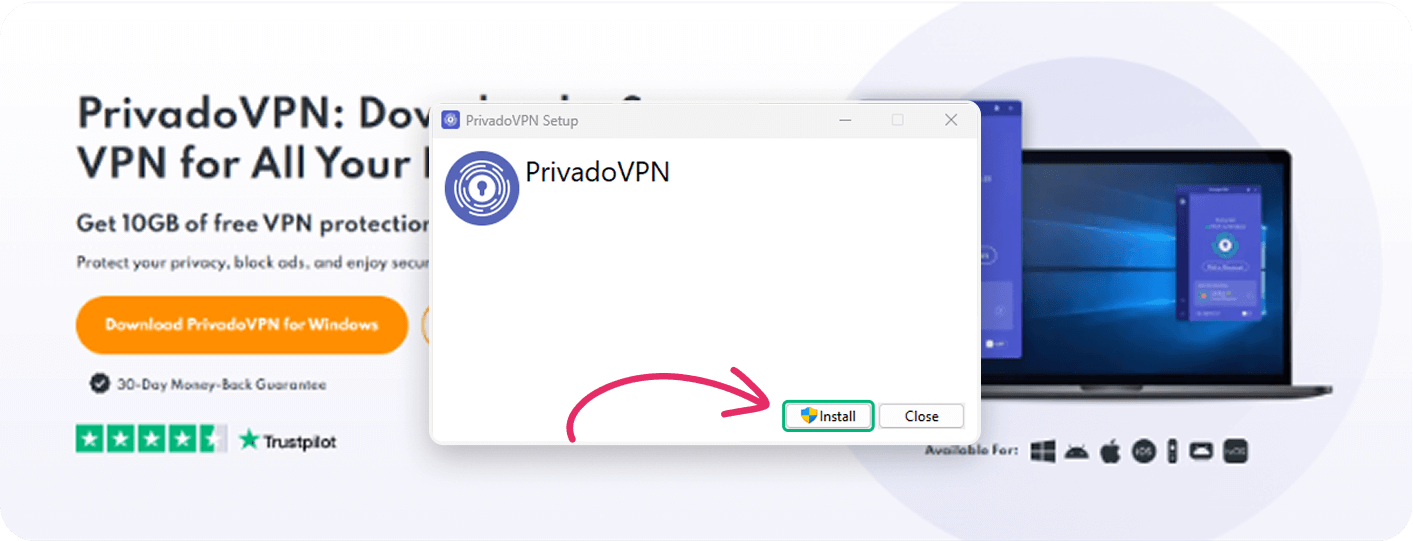
Click "Install":
-
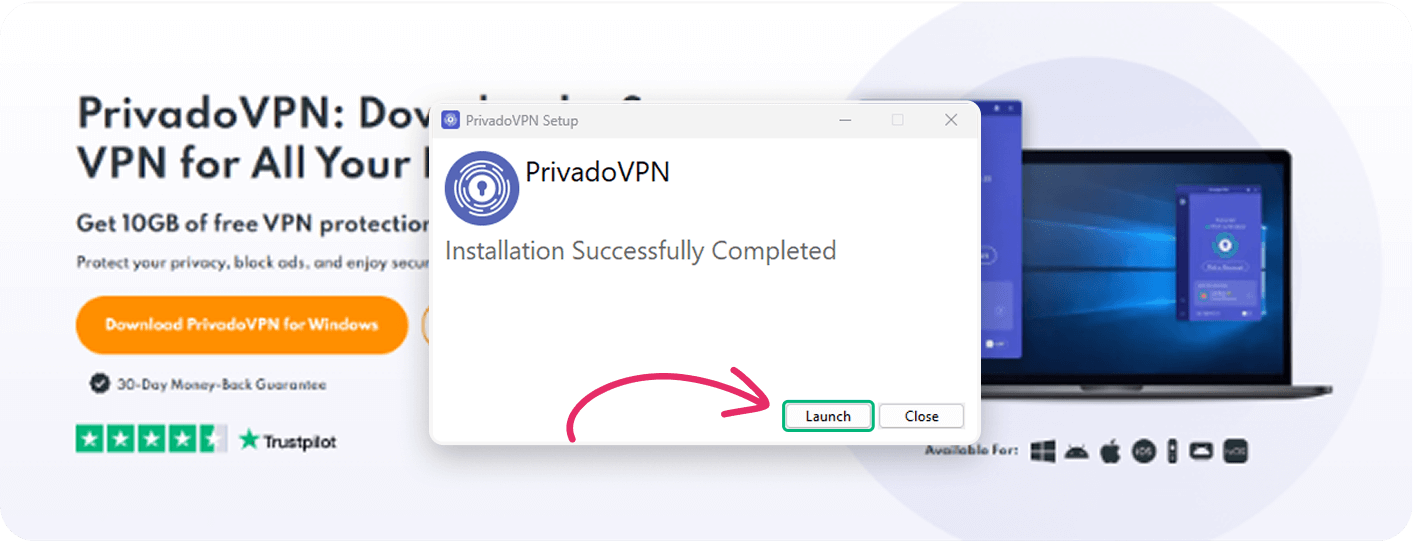
Your PrivadoVPN app is now set up and ready to use. Click "Launch":
-
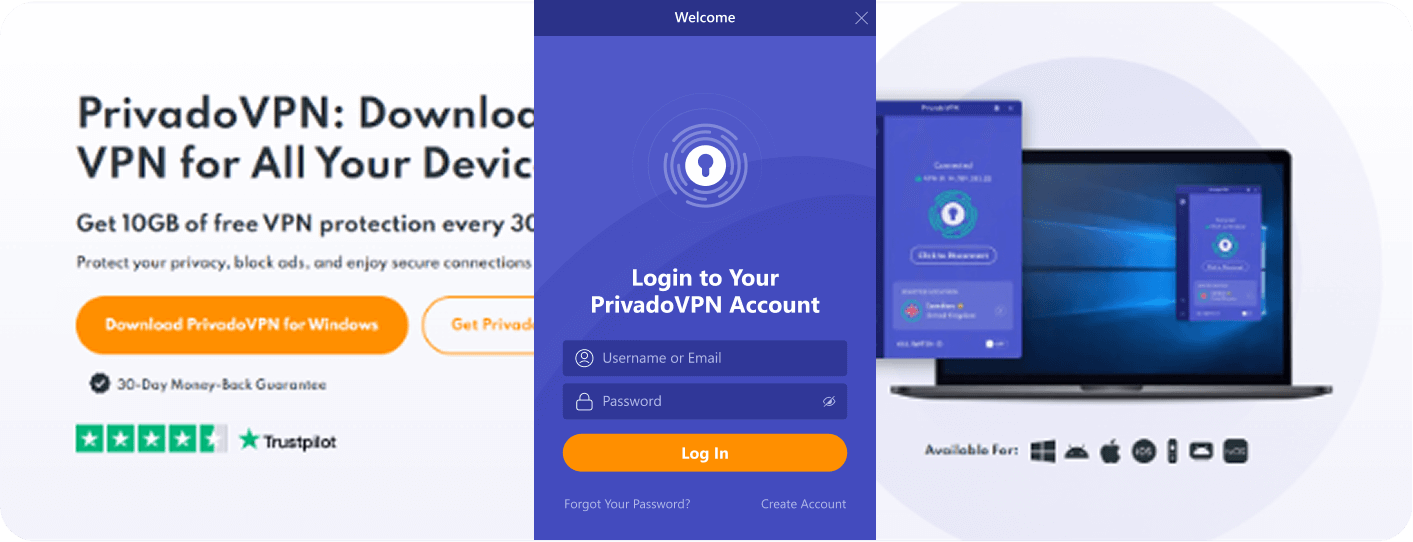
After installation you'll see the screen where you can press "Sign up" (if you want to create a new PrivadoVPN account) or "Log in" (if you already have an account):

-
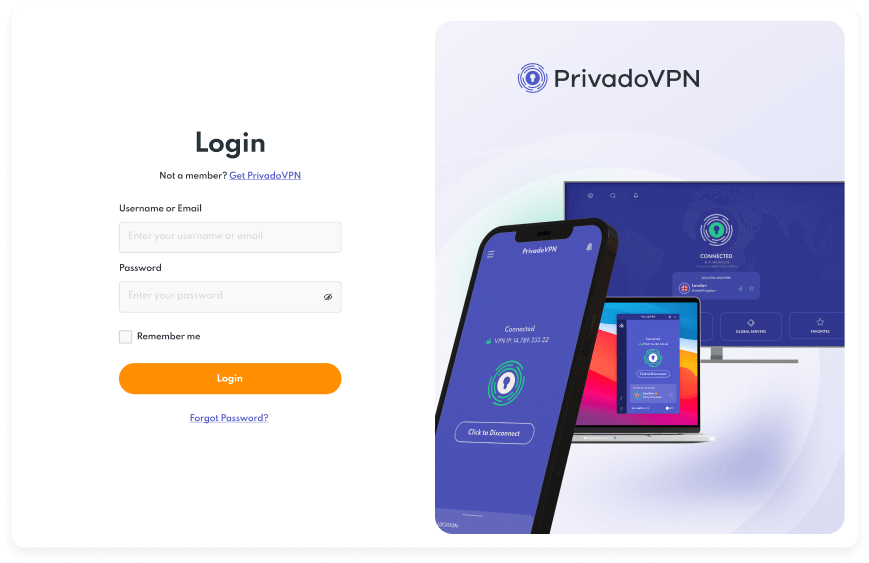
Enter your registered PrivadoVPN username and password, and click on the "Log in" button.
-
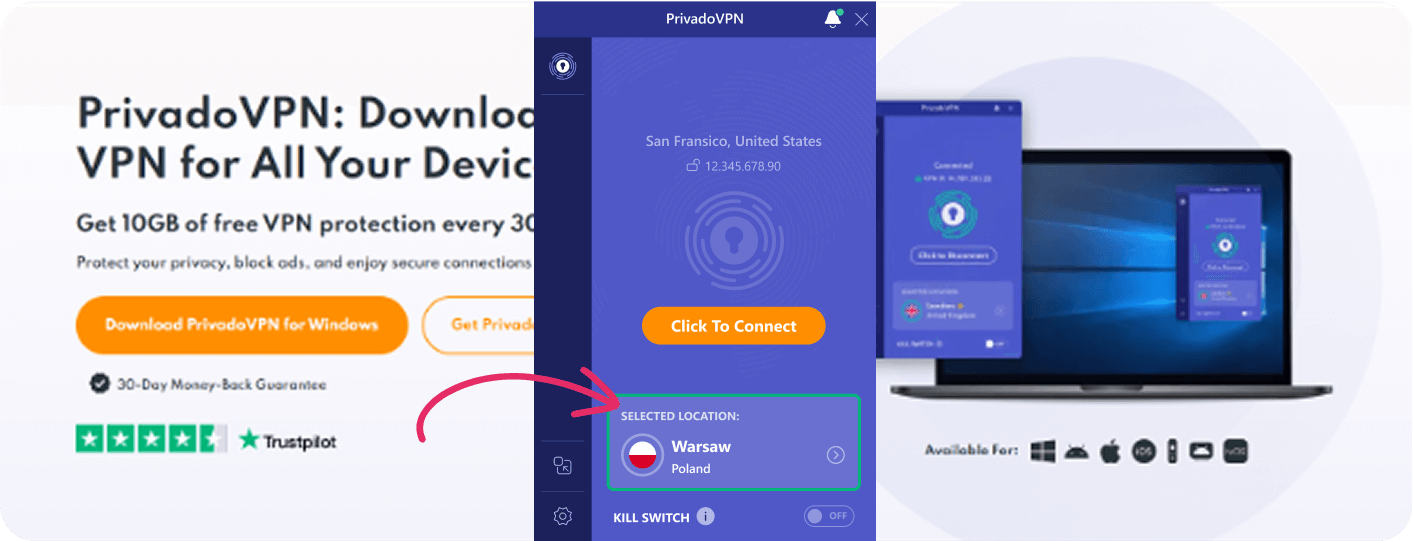
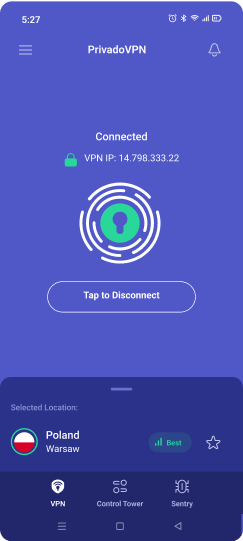
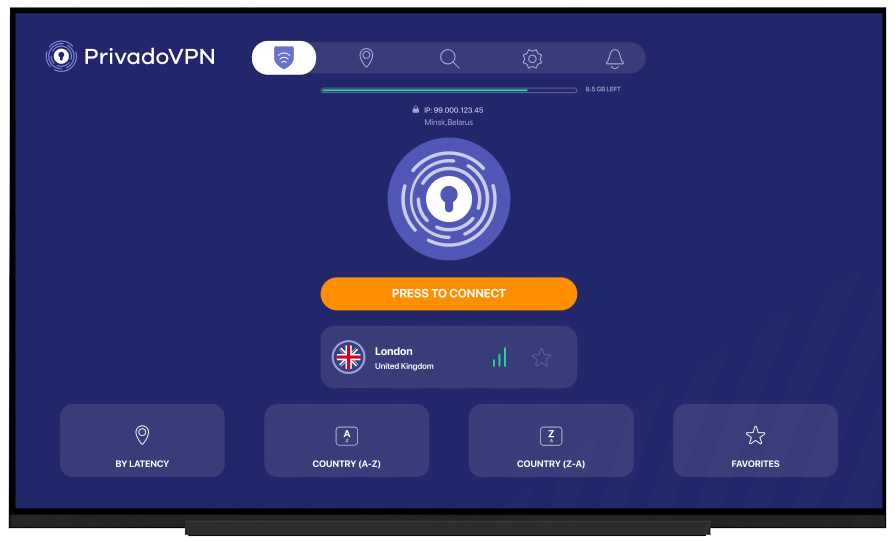
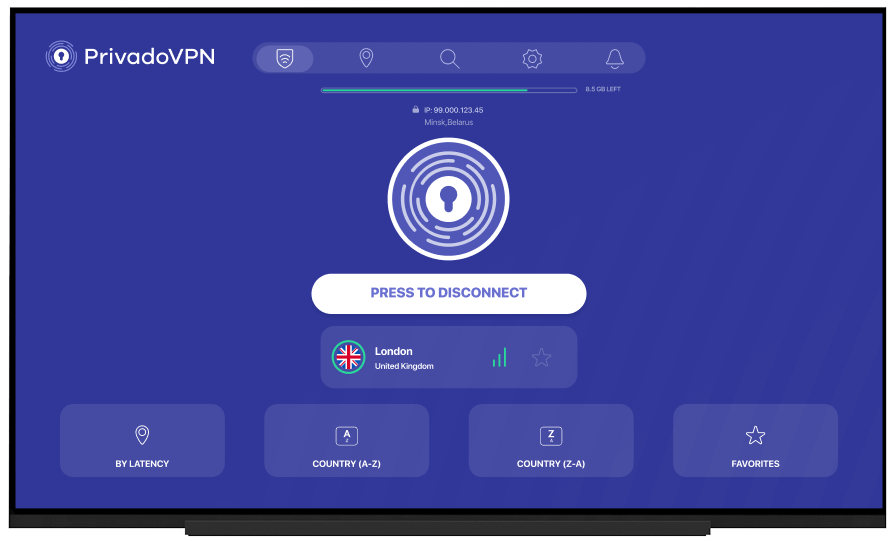
Once logged in, you will see the main interface of the app.
You can easily connect to the nearest or fastest VPN server by clicking on the keyhole icon in the center of your screen or the "Click to Connect" button (this will automatically choose the server with the fastest speed for your physical location).
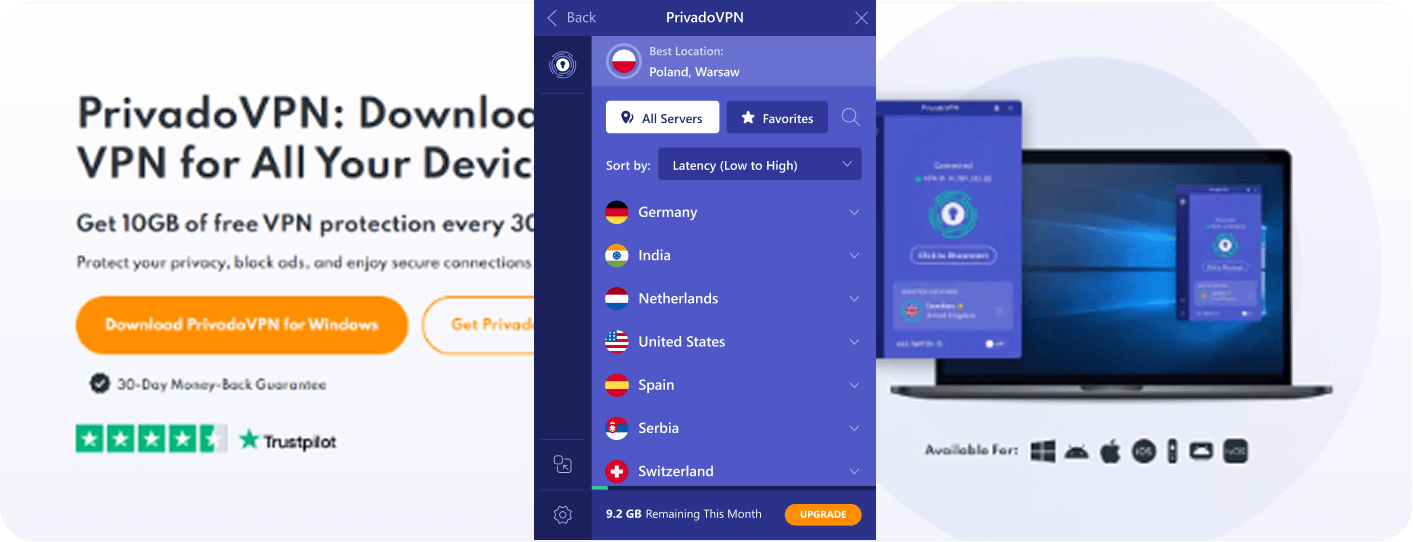
Alternatively, click the "Server Location" section, select your preferred VPN server, and then connect:
If you have any further questions or concerns, feel free to reach out to us via our Support Form
Contact Support-
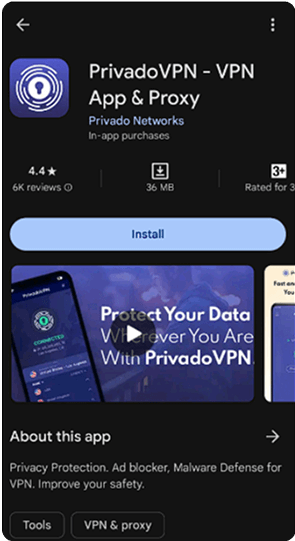
Either go to the App Store (IOS) or Play Store (Android) and search for PrivadoVPN.
-
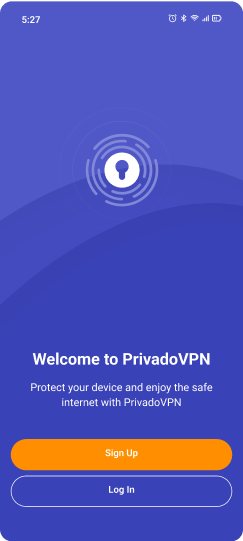
After installation, open the App, and you'll see the screen where you can press "Log in".
-
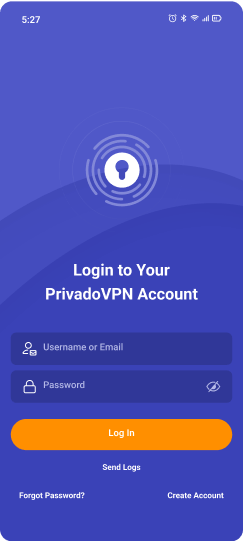
Press the "Login" button.
-
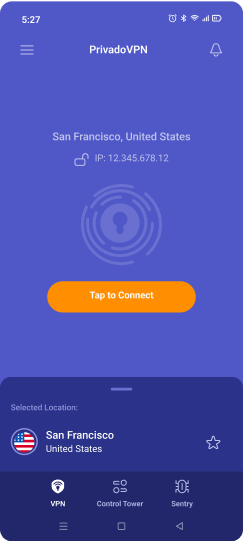
Once logged in, you will see the Server Connection Screen:
-
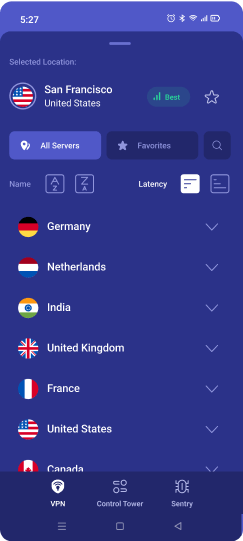
From here, you may tap on the "Tap to Connect" button to connect to the "Best Available" server for your current connection/location. This will be the fastest and easiest way to secure your connection with the PrivadoVPN app.
-
Alternatively, select a VPN server from the list if you need a specific country/city:
Account & App Settings Menu
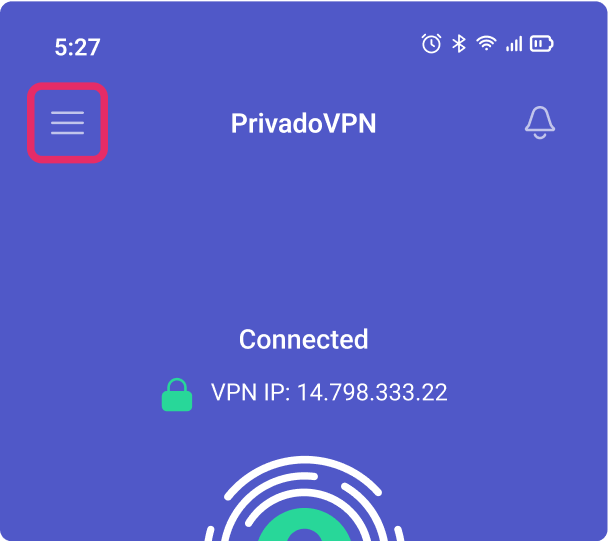
Tapping the hamburger (3 bars) icon in the top left corner will take you to the App Settings Menu.
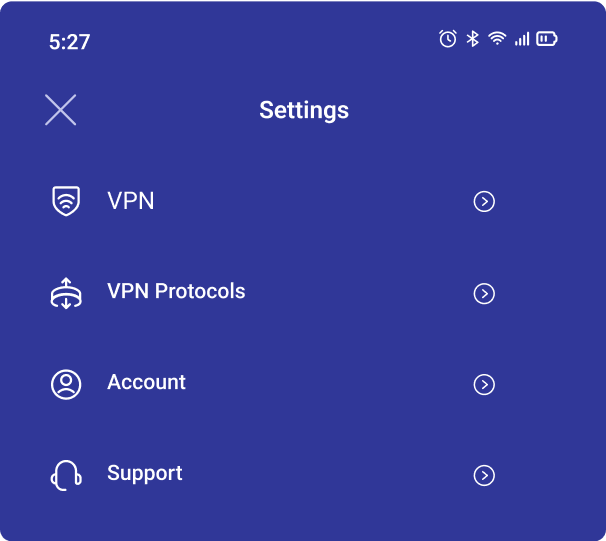
Here you will see the VPN, VPN Protocols, Account, and Support options:
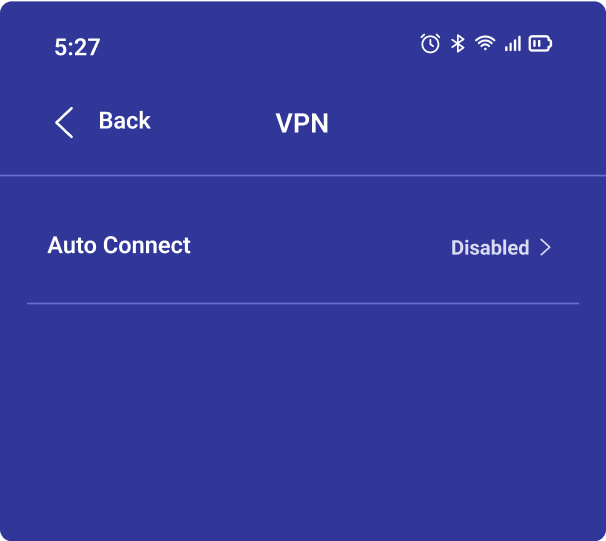
VPN
Here you can activate the Auto Connect option:
Auto Connect: enabling this option will force the App to automatically connect to the selected option:
- Best Location – the best available server based on your current network environment
- Previously saved location – the last server that you successfully connected to
- Random – Randomly selected server based on the servers currently available
VPN Protocols
Here you can change the VPN protocol options for the App.
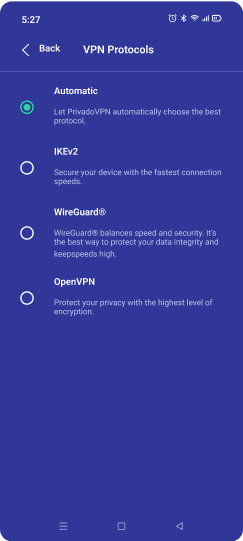
- Automatic – The PrivadoVPN app will choose the best protocol for your network environment.
- IKEv2 – This is a stable and secure protocol; it is recommended for most network conditions.
- WireGuard® – This is a new, open-source, and very fast (compared to previous standards) VPN protocol that uses advanced cryptography.
- OpenVPN – This protocol can be used when a specific protocol (TCP/UDP) and/or port is needed:

- UDP is a better choice for live video and audio or online games where speed is more important than potential data loss. We also offer UDP ports 1194, 443, 8080, and 8443 in cases when your ISP or local transit carrier throttles certain ports. If UDP fails, try TCP.
- TCP is the better option if you are having issues maintaining a stable connection or need increased security of connection without packet loss. It is also recommended for countries with restrictive Internet. We also offer TCP ports 1194, 443, 8080, and 8443 in case your ISP or local transit carrier throttles certain ports.
- Scramble (currently available for iPhones only) helps to disguise and hide VPN traffic. This is especially useful in network environments that restrict OpenVPN traffic/ports.
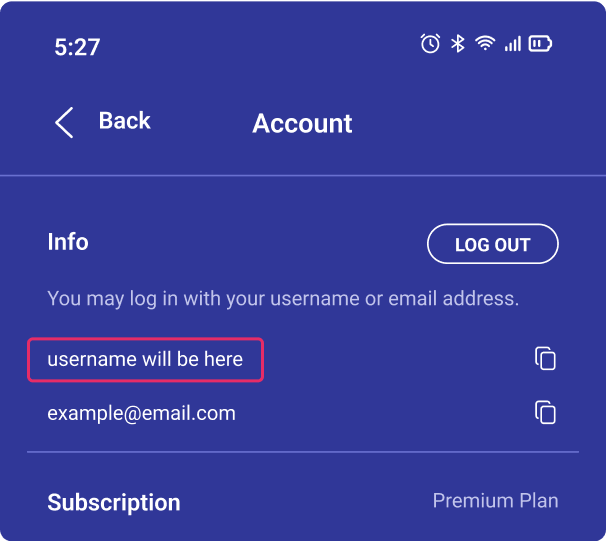
Account
Here you can see the Username of the account that is currently logged in:
Support
Here you will see the Crash Report, View Application Data, Contact Us, and Application version options:
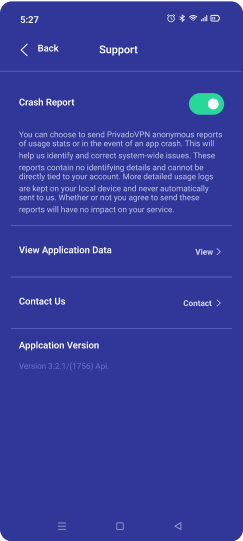
- Application version - shows the current App version.
- View Application Data – this menu is used for viewing the connection log and/or troubleshooting with our Support Team:
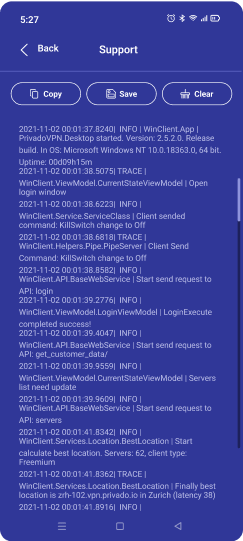
- Copy – Tap the "Copy LOG" button to copy the log to send in messages and/or save it to your device (NOTE: you will see "Copied to the clipboard" at the bottom of the screen when the log is copied).
- Save – The "Save" button is used for saving the log.txt file on your device.
- Clear – This button clears the log screen.
If you have any further questions or concerns, feel free to reach out to us via our Support Form
Contact Support* If you see a message that your macOS version is incompatible with this app, please reach out to our Support, and we will email you the compatible app version: https://support.privado.live/new.
-
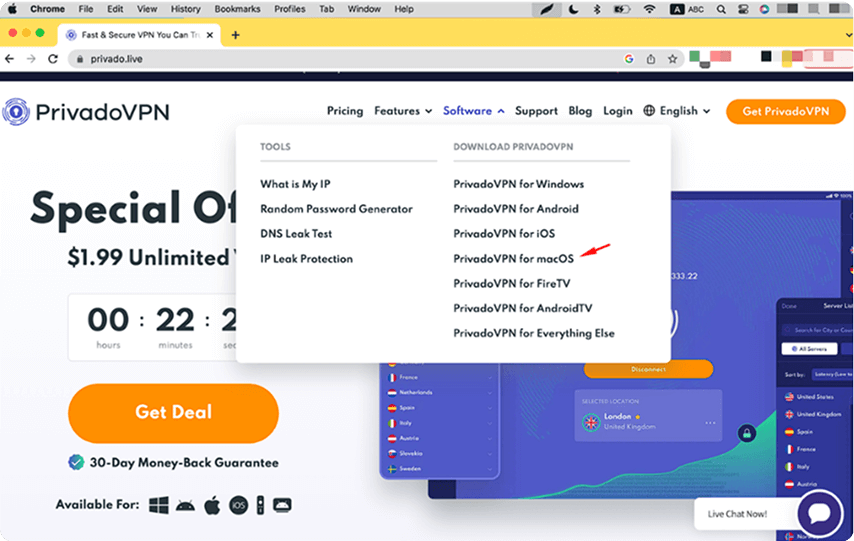
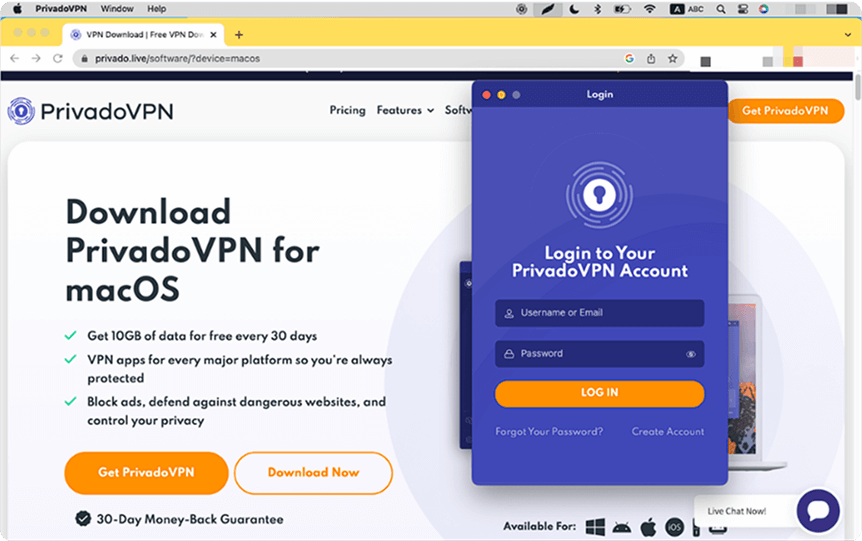
Go to the Privado website > Software > and click "PrivadoVPN for macOS":
-
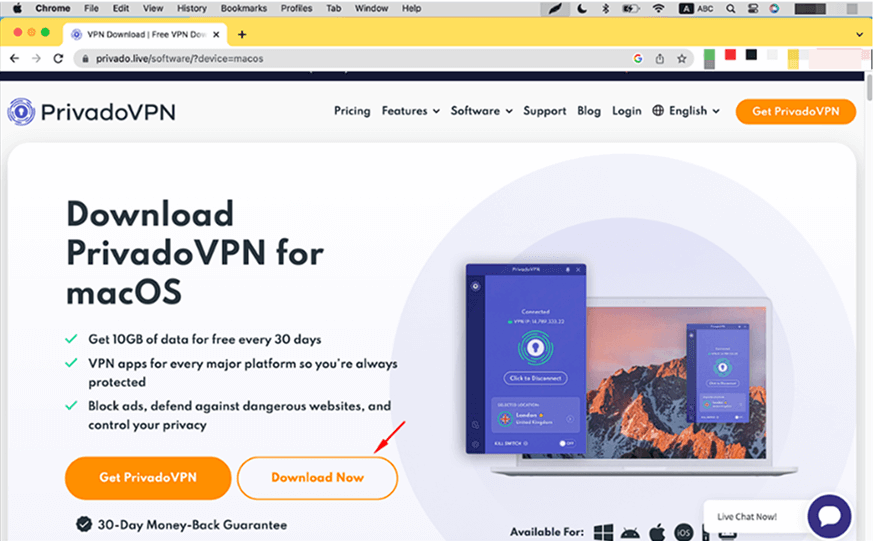
Click "Download Now":
-
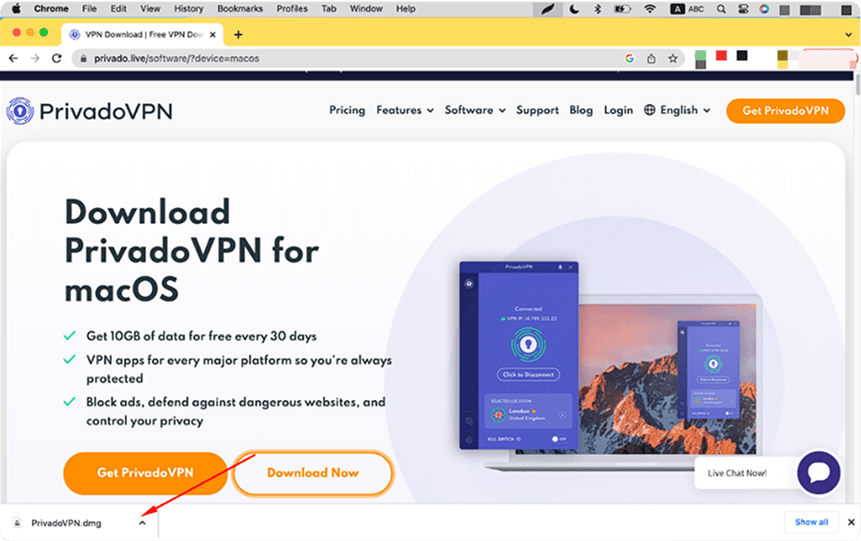
Double-click on the downloaded app or find it in the "Downloads" folder of your favorite browser:
-
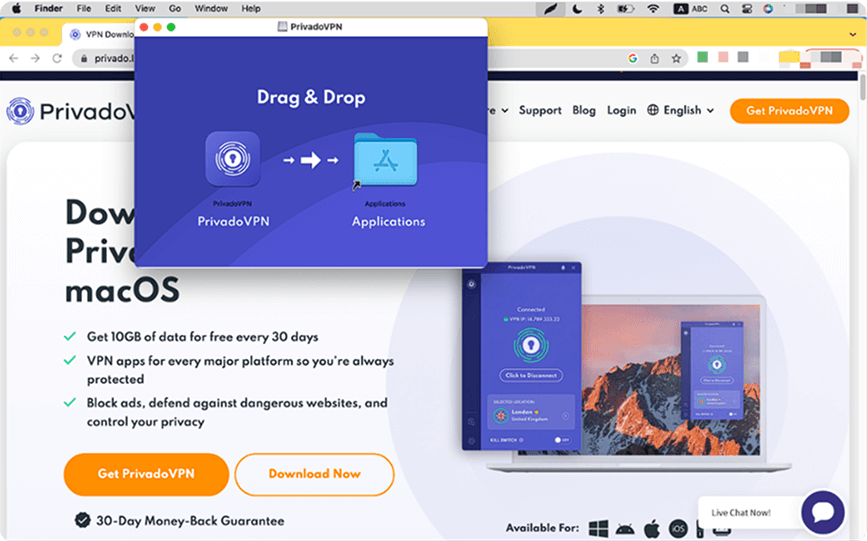
Drag the app into the Applications folder of your Mac:
-
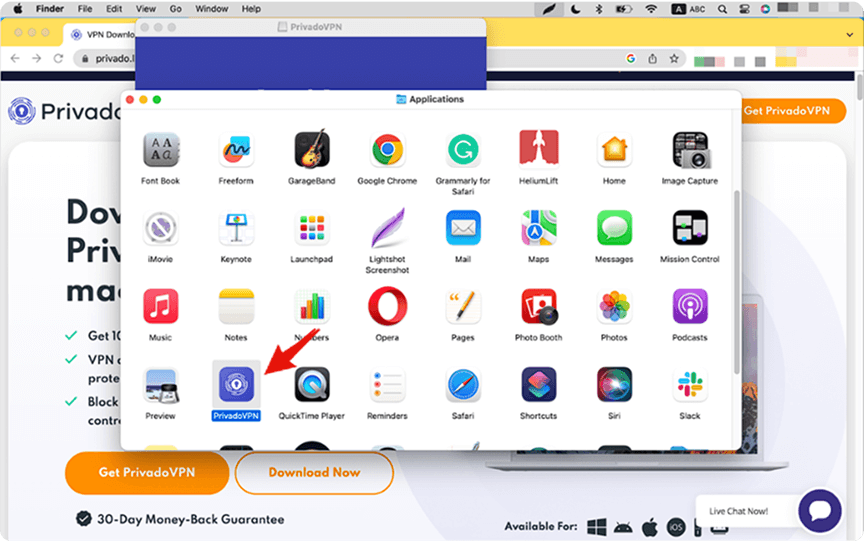
Double-click on the PrivadoVPN app to begin the installation:
-
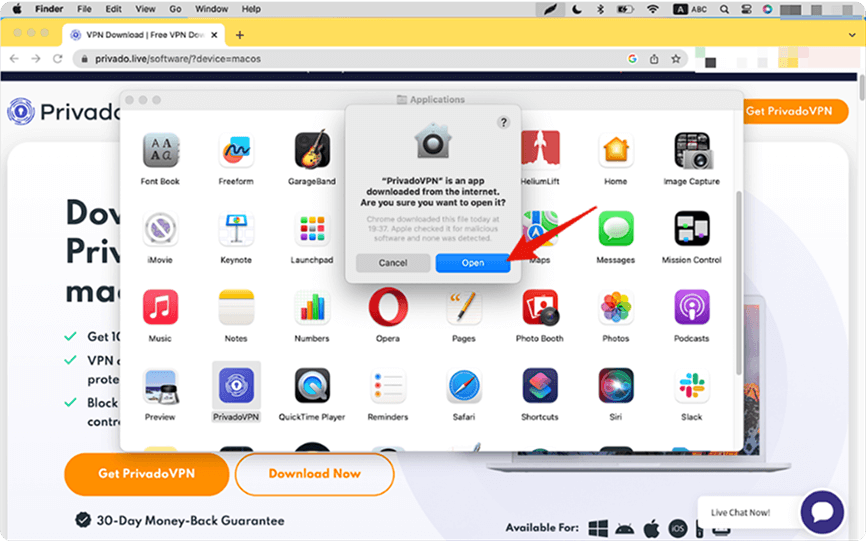
Click "Open":
-
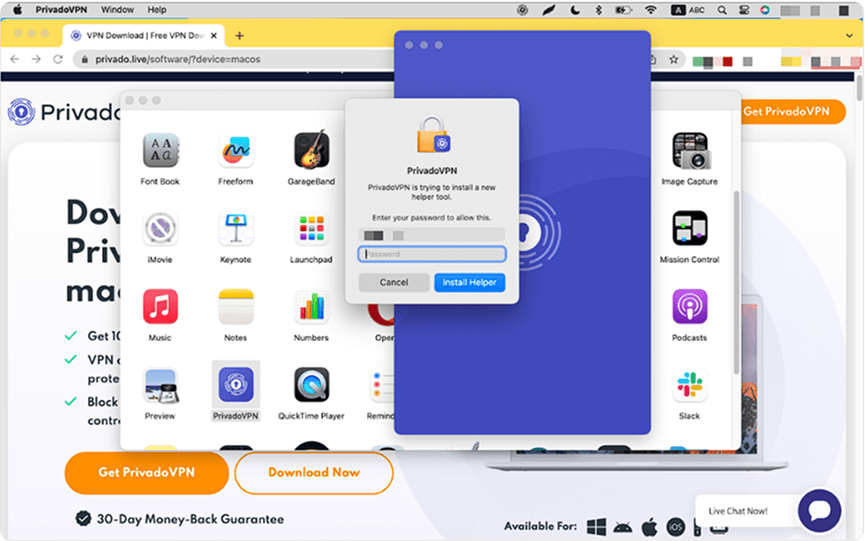
Enter your Mac password to approve the installation of the Helper tool, (it is a necessary component of the PrivadoVPN app):
-
Log in to the PrivadoVPN app using the username and password you received from us:
-
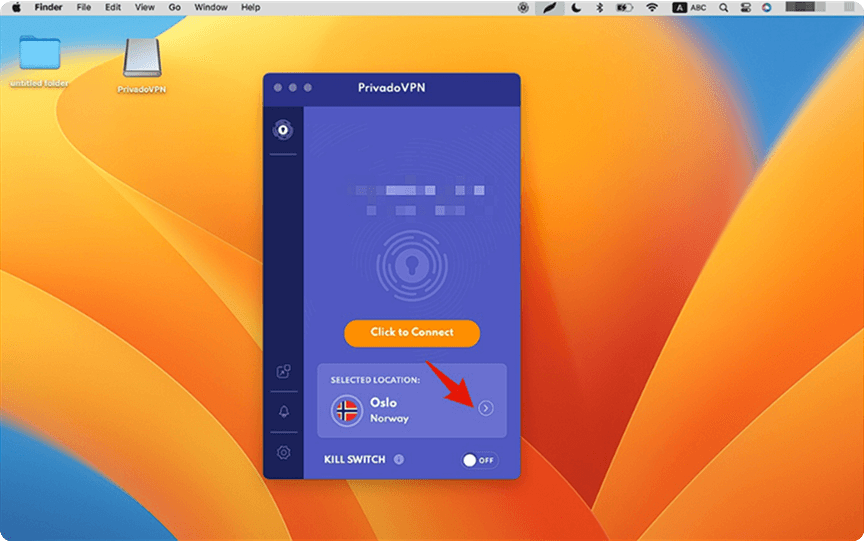
Hit the "Click to Connect" button to connect to the "Best available" server for your location, or click the small arrow to select your preferred VPN server and then connect:
-
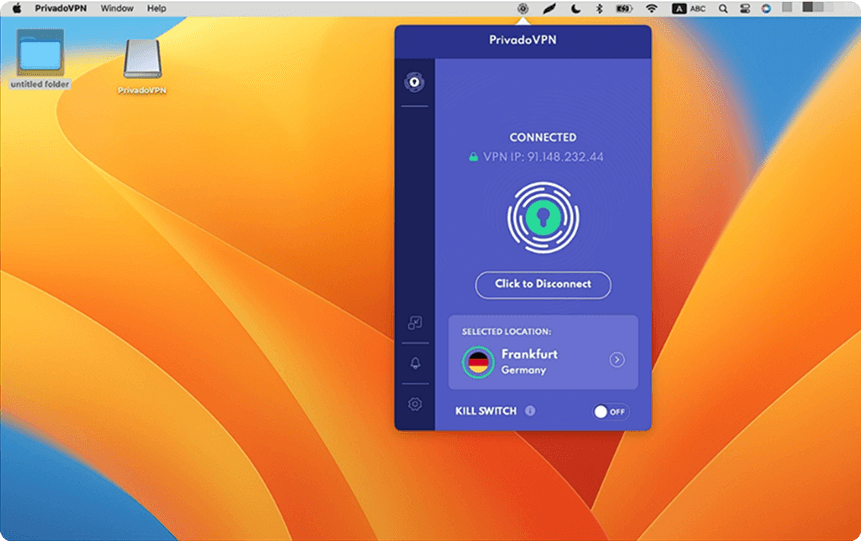
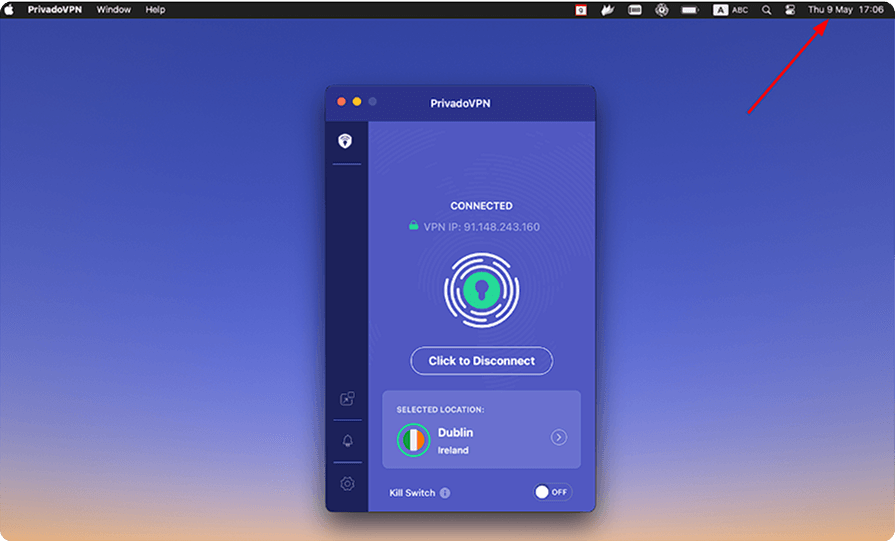
All done! You have successfully connected to a PrivadoVPN server:
-
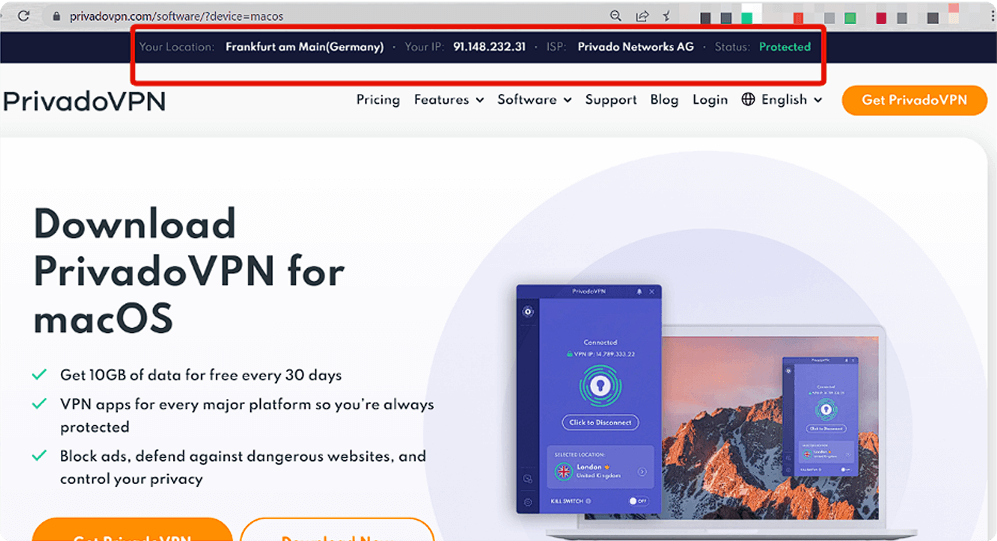
To double-check if your connection is successful, please return to the PrivadoVPN website and verify your IP address on top of the page:
If you have any further questions or concerns, feel free to reach out to us via our Support Form
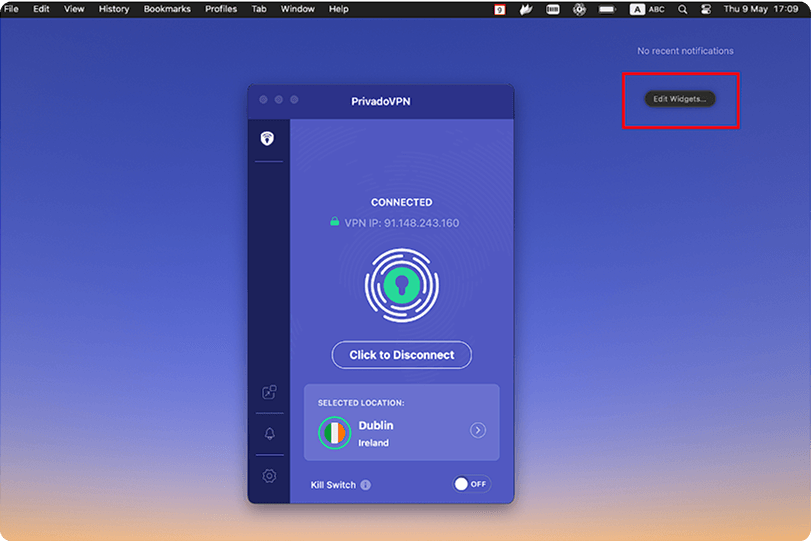
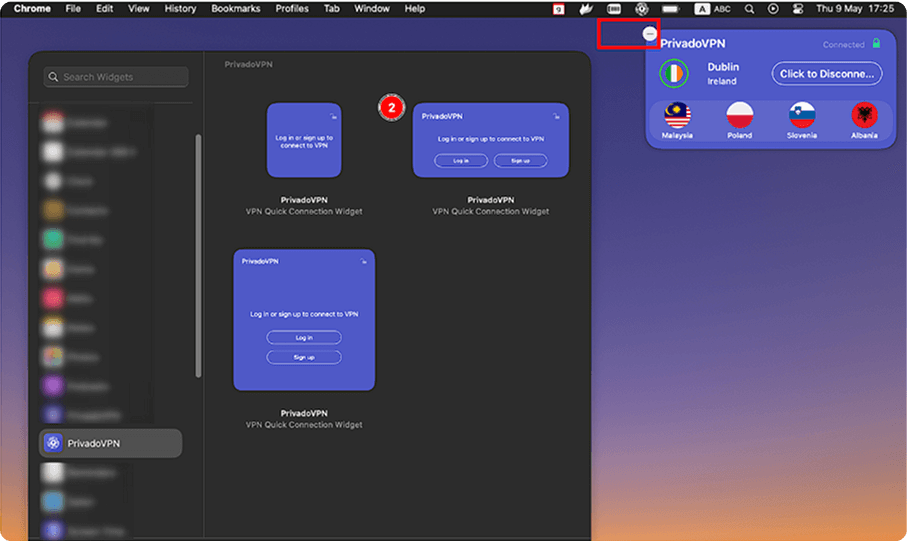
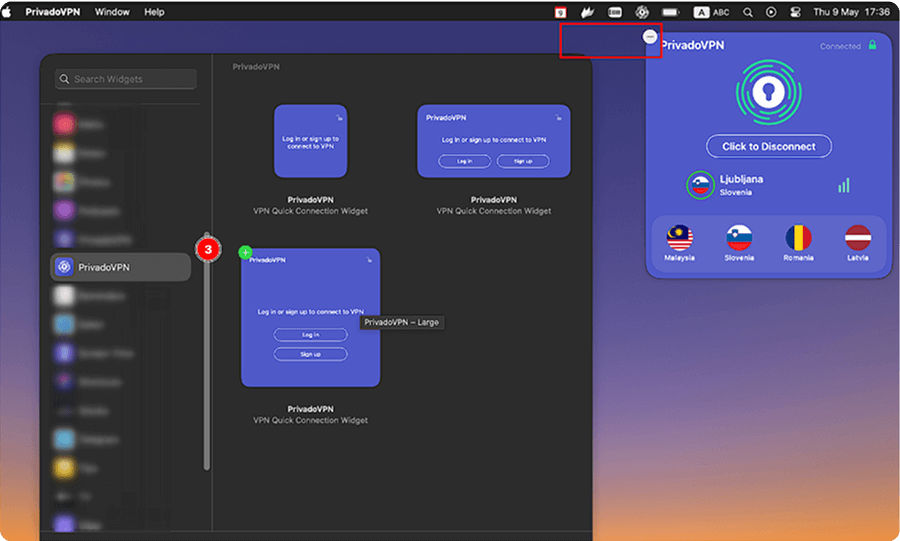
Contact Support** Widgets on macOS 14+ and above are interactive, enabling quick actions and easy movement on the desktop. On older macOS versions, the widgets are fixed to the left upper corner. Clicking on a widget will prompt the Privado app to open and give access to additional actions and features.
-
In the upper right corner of the taskbar, click on the time and date to open Widgets settings:
-
Click "Edit Widgets":
-
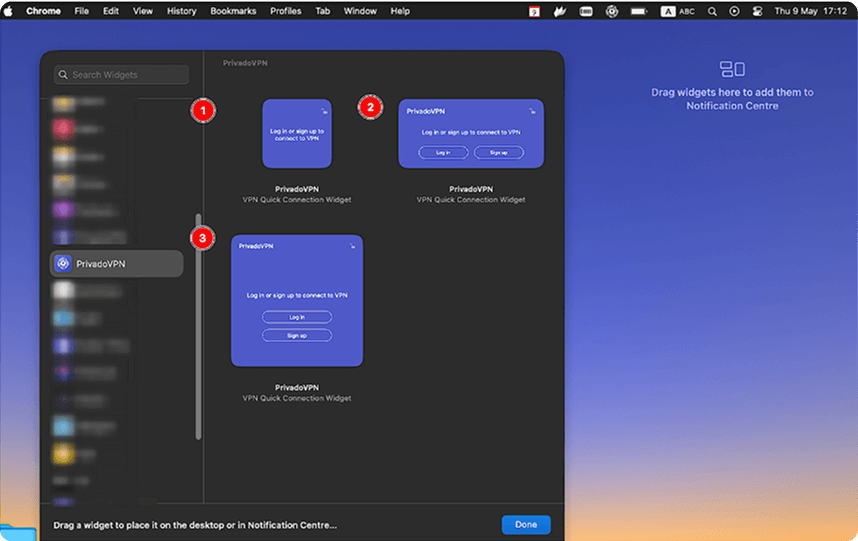
Scroll down to find PrivadoVPN, or type PrivadoVPN in the search box. 3 widget options will open. Drag and drop your preferred widget option onto your desktop. The widget will then be easily accessible in the Notification Center.
-
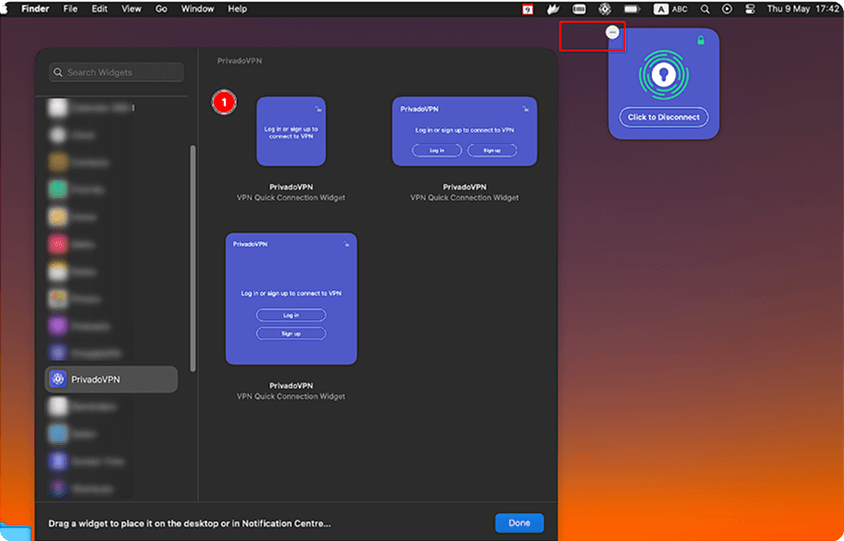
The first widget performs the quick "Connect" or "Disconnect" action. Click on "—" if you need to remove the widget from the Notification Center:
-
The second compact widget displays the connection status and the recommended server locations. Click on the country icon to reconnect to the selected location immediately. In case you wish to eliminate the widget from the Notification Center, simply click on the "—" symbol:
-
The third larger widget provides all the above functions. Additionally, clicking on its sides will open the Privado app.
If you have any further questions or concerns, feel free to reach out to us via our Support Form
Contact Support***Versions 10 & 11. ****
****Tested on Nivida Shield and Sailfish variant.
-
From your Android TV, launch the Google Play Store application and search for PrivadoVPN.
-
Once installed, either launch PrivadoVPN from the Play Store or go back to your home screen and navigate to Apps > PrivadoVPN to launch the app.
-
With the app open, you can now log in with your existing credentials or create a new account.
-
After you log in, you'll see a server list at the bottom with VPN server locations to choose from.
Note: By clicking the settings icon in the upper left, you can view more information about your account.
If you have any further questions or concerns, feel free to reach out to us via our Support Form
Contact Support-
Using your Fire TV remote, navigate to Find > Search.
-
Enter "privadovpn" in the search box and navigate to the privadovpn search below and select it to search the Appstore.
-
Once the search is complete you will see the PrivadoVPN app at which point you will select it and then select "Get" to install the PrivadoVPN app.
-
After it is installed, you can click the Menu button to launch, or you can navigate to Home > Your Apps & Channels and select the PrivadoVPN app.
-
When the app is first launched, you will be presented with the Login screen where you select the Login button and then enter your PrivadoVPN username and password:
-
Once logged in, you will be presented with the location menu where you can select your preferred VPN server. Then navigate to the lock icon and click on the icon to connect
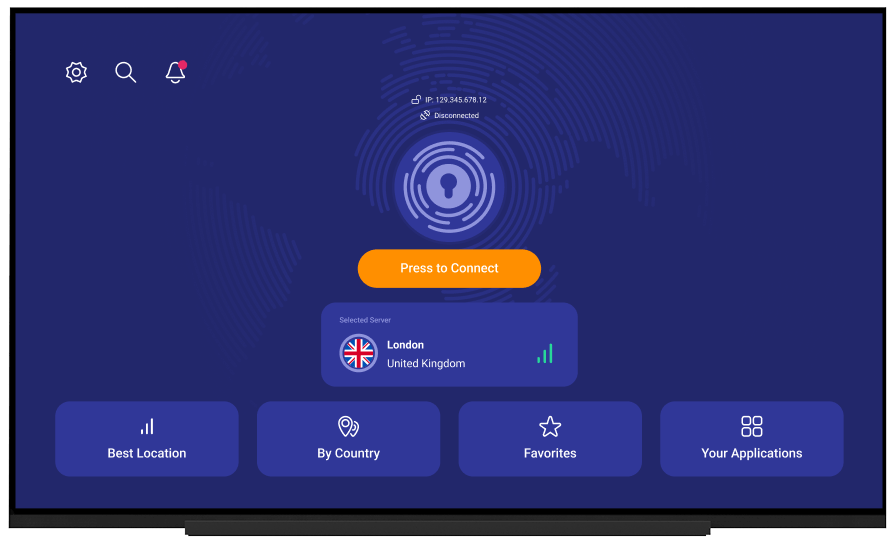
-
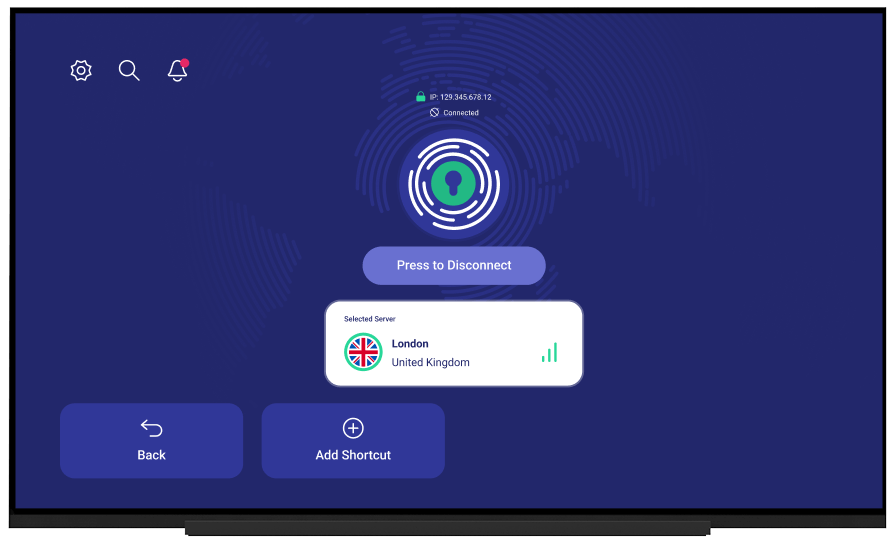
Next, you will see the lock icon change to show "CONNECTED" in green confirming you are successfully connected to the selected location:
If you have any further questions or concerns, feel free to reach out to us via our Support Form
Contact SupportUpdate your Apple TV to tvOS 17 or newer to use the PrivadoVPN app.
-
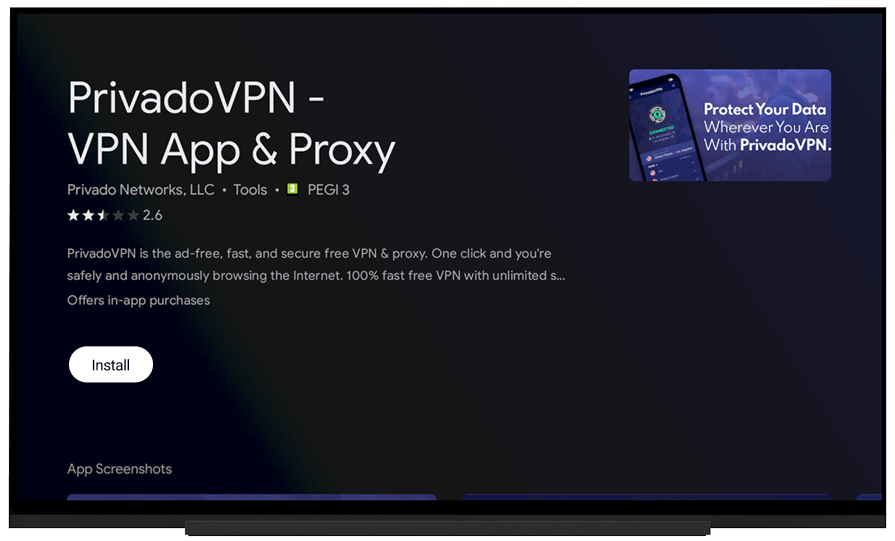
Open the AppStore app, search for PrivadoVPN, and click the Get button.
-
After that, the PrivadoVPN VPN app will be downloaded to your Apple TV.
-
Once the download is complete, select Open to launch the PrivadoVPN app.
-
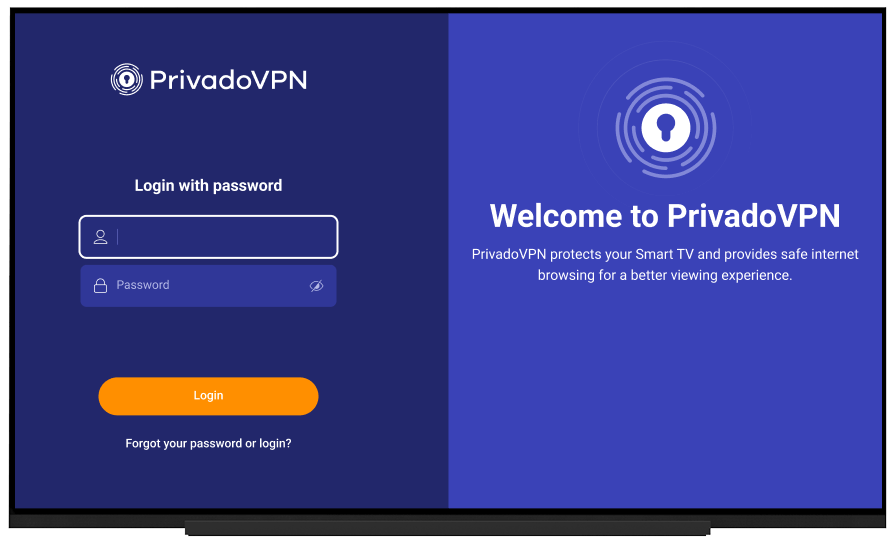
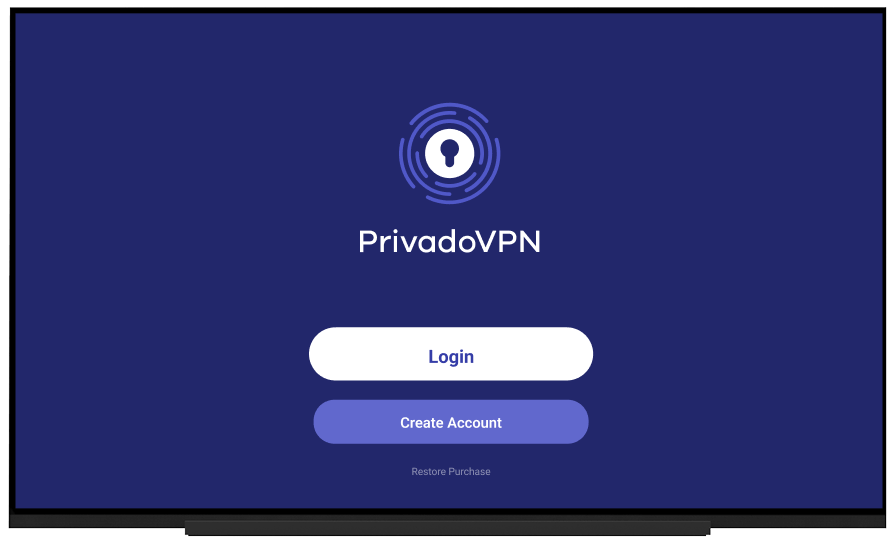
Click on the Login button if you already have a subscription:
-
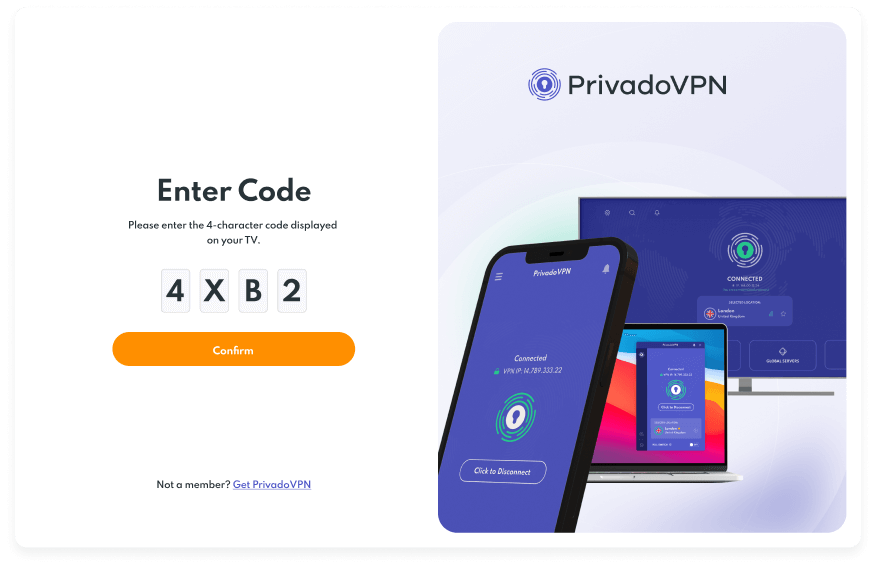
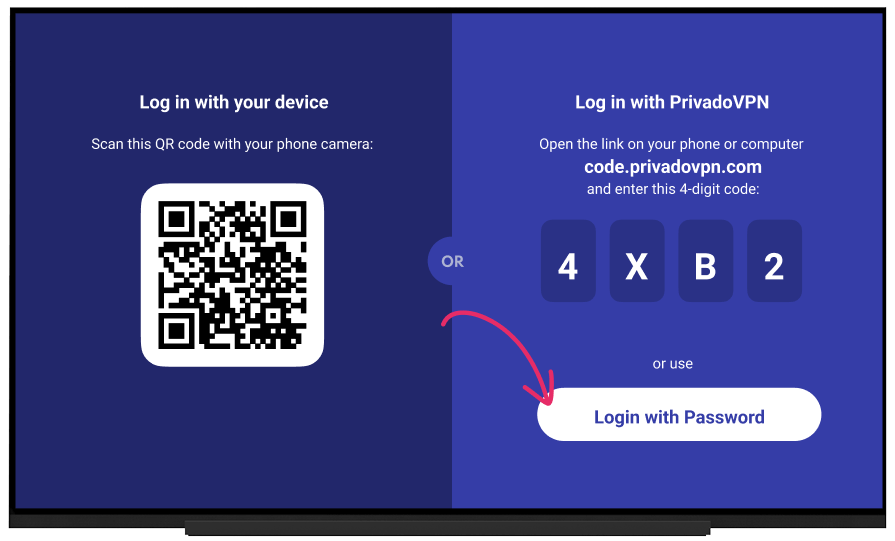
After clicking on the Login button, the app will generate a special 4-digit code:
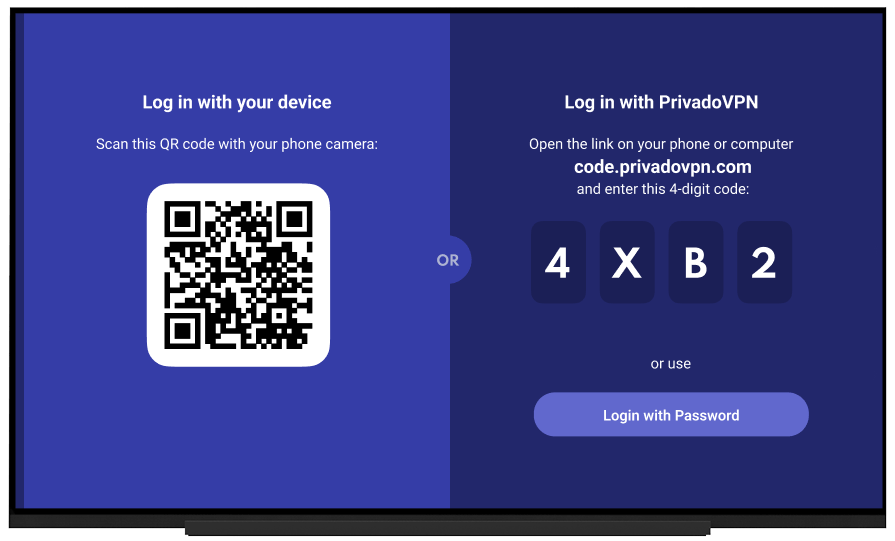
-
Scan the QR code with your phone's camera or open https://code.privadovpn.com/ in a browser on your computer or phone, log in with your credentials and enter that code:
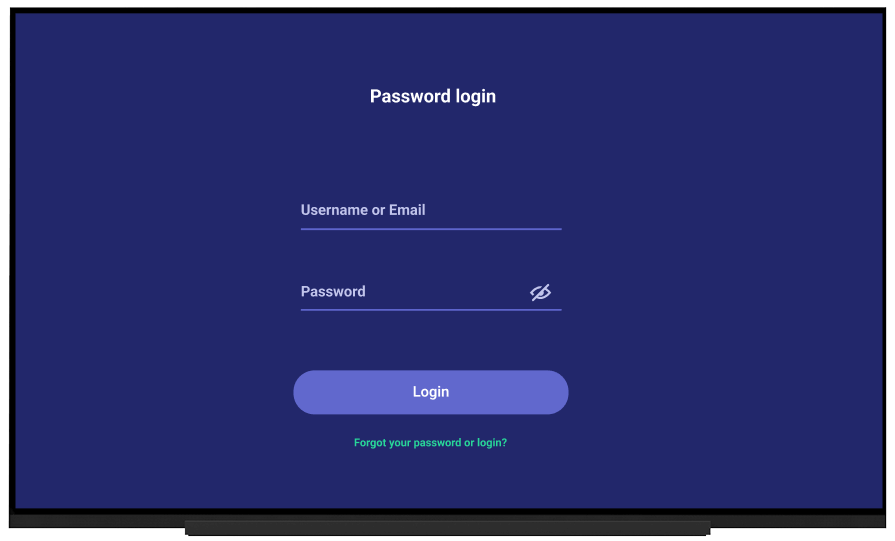
You can also log into the app directly on AppleTV clicking the "Login with Password" button and using your credentials:
-
Once logged in, you will be presented with the location menu where you can select your preferred server and connect VPN:
If you have any further questions or concerns, feel free to reach out to us via our Support Form
Contact SupportNeed Help? We're Here for You!
If you have any questions or need assistance with setting up your Newshosting VPN, our support team is here to help. Our dedicated team is available so your VPN setup is smooth and hassle-free. Visit our support page to get in touch, and we’ll guide you through every step of the process.
Contact Support